Disabling Imaging
Occasionally, you might want to disable the imaging of drops or plates
that you have previously defined for imaging scheduled by using the
Disable Imaging button![]() in the Images contextual tab
set. This button enables you to disable the imaging of specific field,
including whole drops, the ROI in selected drops, or even disable the
imaging of single or multiple plates in one or more experiments. In this
tutorial, you will learn how to disable imaging from ROCK MAKER.
in the Images contextual tab
set. This button enables you to disable the imaging of specific field,
including whole drops, the ROI in selected drops, or even disable the
imaging of single or multiple plates in one or more experiments. In this
tutorial, you will learn how to disable imaging from ROCK MAKER.
Note
The Disable Imaging button in the Drop(s) tab of the Images contextual tab set has been removed from ROCK MAKER version 3.14 and newer. Its functionality is included in the Disable Imaging Options that appear when you click the Disable Imaging button in the Imaging tab of the Images contextual tab set.
Prerequisites
You are running ROCK MAKER version 3.14 or newer.
You have an experiment which contains images in ROCK MAKER.
Your experiment contains at least one plate with a future imaging session scheduled.
To disable imaging:
Open an experiment in the Explorer.
In the Canvas view, select the drop(s) you want to disable for imaging. To select multiple drops, press and hold the Ctrl key on your keyboard while selecting the desired drops.
Then, click the Disable Imaging button
 in the
Imaging tab of the Images contextual tab set.
in the
Imaging tab of the Images contextual tab set.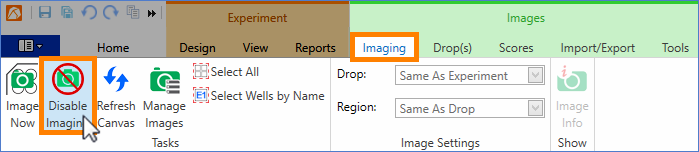
The Disable Imaging Button in the Imaging Tab of the Images Contextual Tab Set
After the Disable Imaging Options window appears, you can select the affected field you wish to disable.
To disable imaging of the selected drop(s):
Select the Disable Selected Drop(s) option, then click OK.
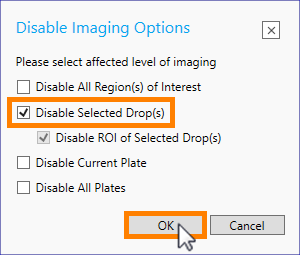
Selecting Disable Selected Drop(s) from Disable Imaging Options
Important
The Disable ROI of Selected Drop(s) option will automatically be selected when you select the Disable Selected Drop(s) option. ROCK IMAGER will automatically disable ROI imaging when imaging for the selected drop is disabled. To disable imaging of a whole drops without disabling ROI imaging, you can right-click on the selected drops and select Disable Imaging.
Note
A red slash icon
 will appear at the bottom of the drop image as seen in the Canvas view, and at the left corner of the drop image as seen in Well/Drop view, indicating that the imaging for the selected drop has been disabled.
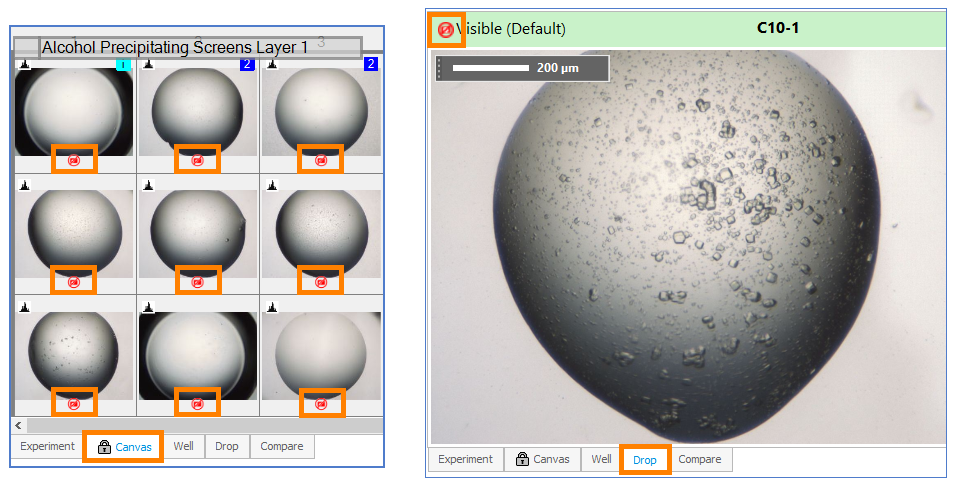
Disabled Imaging as Seen in Canvas View (Left) and in Well View (Right)
To disable imaging of the Region(s) of Interest of the selected drop(s):
Select the Disable ROI of the Selected Drop(s) option, then click OK.

Selecting Disable ROI of the Selected Drop(s) from Disable Imaging Options
Note
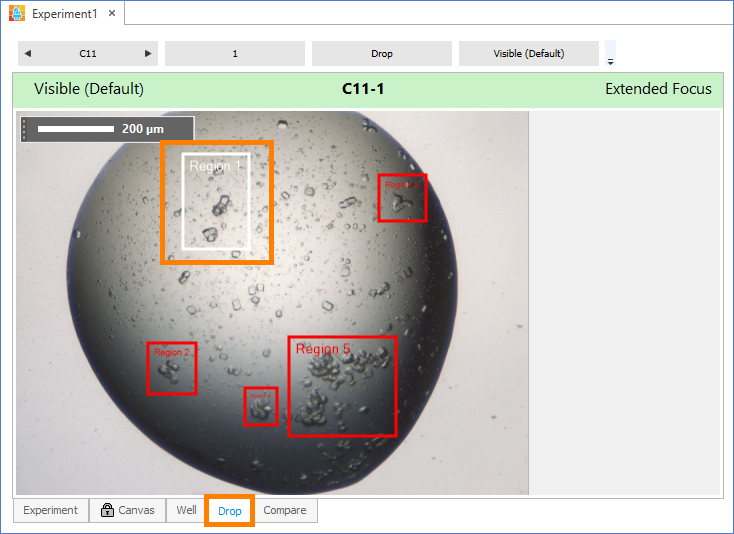
To check whether or not the imaging for ROI in the selected drops are disabled, you can go to Well or Drop view. If imaging has been disabled for the ROI, the ROI will be highlighted by a white box (outlined in orange in the image below).
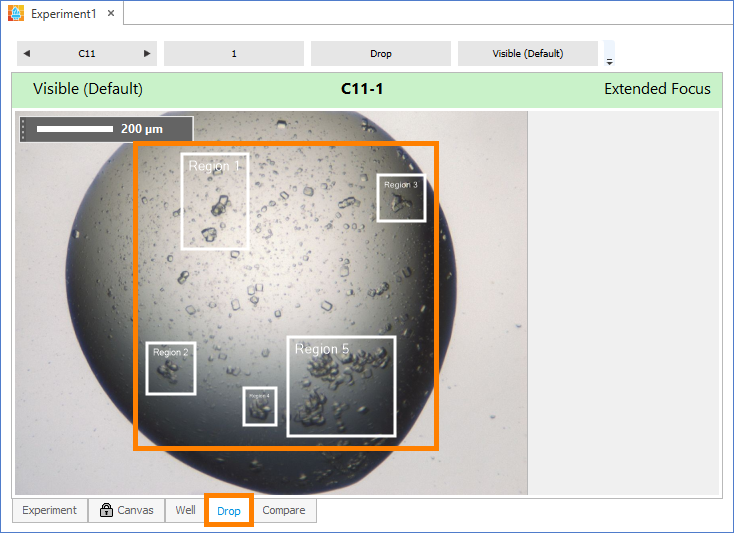
ROI Imaging is Disabled
Note
Disabling ROI imaging using the Disable Imaging options will automatically disable imaging for all ROIs in the selected drops.
OPTIONAL: If you don’t want to disable imaging for all of the ROI in the selected drop, please follow this tutorial:
Open the selected drop in Drop view, and click the ROI for which you want to disable imaging.
Then, right-click on the ROI field and select Disable Imaging.
Note
To check whether the selected ROI is disabled or not, you can click on any field outside the ROI. If the selected ROI appears surrounded by a white box, it means that its imaging has been disabled.
Imaging is Disabled for the ROI Surrounded by a White Box
To disable imaging of the Region(s) of Interest in all drops:
Select the Disable All Region(s) of Interest option in the Disable Imaging Options window, then click OK.
Selecting Disable All Region(s) of Interest from Disable Imaging Options
Note
Go to the Well or Drop view to check if the imaging for all ROIs in the current plate have been disabled. The ROI will be outlined in a white box, indicating that the imaging for the ROIs is disabled.
To disable imaging of the currently opened plate:
Select the Disable Current Plate option in the Disable Imaging Options window, then click OK.
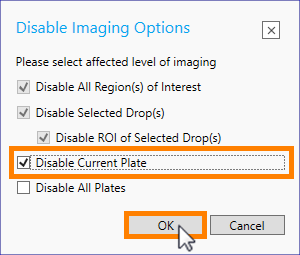
Selecting Disable Current Plate from Disable Imaging Options
Note
Selecting Disable Current Plate will automatically select the Disable All Region(s) of Interest, Disable Selected Drop(s), and Disable ROI of Selected Drops options.
Note
A red slash icon will appear
in the Plate icon node in the Explorer, indicating that imaging for the selected plate is disabled.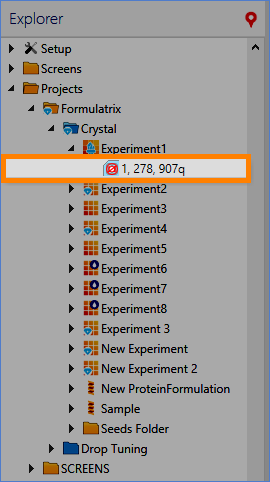
The Imaging of the Current Plate is Disabled
To disable imaging of all plates:
Select the Disable All Plates option in the Disable Imaging Options window, then click OK.
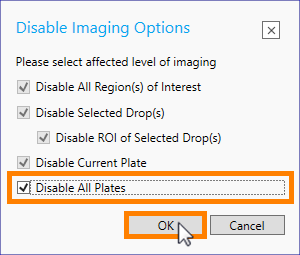
Selecting Disable All Plates from Disable Imaging Options
Note
Selecting the Disable All Plates option will automatically disable all of the other options, including Disable All Region(s) of Interest, Disable Selected Drop(s), Disable ROI of Selected Drops, and Disable All Plates.
Note
A red slash icon
will appear in the Plates icon node in the Explorer, indicating that imaging for the selected plate is disabled.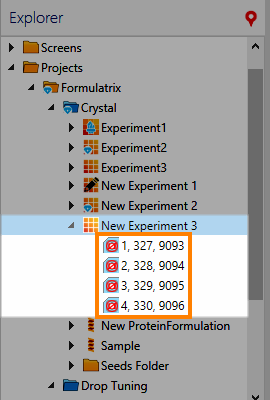
The Imaging of All Plates is Disabled
Note
Disabling the imaging of specific plates will automatically update the imaging schedule’s status to read Disabled. You can check the status by selecting the Imaging Schedule button from View ribbon menu in the Experiment contextual tab set and looking at the State column in the Imaging Schedule Window that appears.
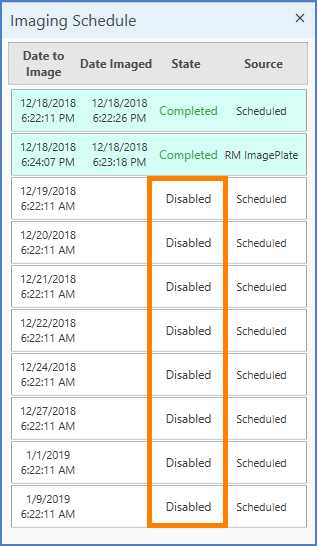
The Imaging Schedule of All Plates is Disabled
Related Topics